
Learn perspective drawing with this beginner guide to one, two, and three point perspective. Improve your skills with Art Tutor Hanoi.
If your drawings of streets, buildings, or interiors feel “off”, the missing key is usually perspective drawing. It is the method that makes objects look realistic and three dimensional on a flat surface, helping you show depth, distance, and space clearly.
At its core, this is based on how we naturally see the world: objects farther away appear smaller, parallel lines seem to meet, and angles shift depending on your viewpoint. Understanding this is the foundation of any effective perspective tutorial.

Key Concepts You Need to Know
This post’s 3 types of perspective you need to know are:
- One point perspective: All lines lead to one vanishing point.
- Two point perspective: Objects are viewed from a corner with two vanishing points.
- Three point perspective: Adds a third point above or below for dramatic views.
These are a few basic terms that you need to know, too:
- Horizon line: your eye level.
- Vanishing point: where lines appear to meet.
- Orthogonal lines: lines that lead to the vanishing point.
Once you understand these, learning how to draw perspective becomes much easier.
How to Practice Perspective Drawing
Start simple. Use cubes and basic shapes, draw light construction lines, and observe real environments around you. Consistent practice is more important than complexity, especially for beginners.
One point perspective is the easiest way to start learning this skill. Best for looking straight down a road, drawing a hallway or room, or objects facing directly toward you,…
- Draw a horizon line (eye level).
- Place one vanishing point on the line.
- Draw lines from your object toward the vanishing point.
- Add vertical and horizontal edges to complete the form.

Best for understanding basic space and depth.
Two point perspective is used for drawing objects from an angle. Common in drawing architectures from a corner view, street scenes, or urban sketching,…
- Draw a horizon line.
- Place two vanishing points far apart.
- Start with a vertical edge of your object.
- Connect its top and bottom to both vanishing points.
- Build the form using lines going to each point.

This is essential for learning how to draw perspective in real environments.
Three point perspective creates more dramatic views. Normally, we use this perspective when drawing dynamic compositions, looking up at tall buildings or down from height.
- Start with two point perspective.
- Add a third vanishing point above or below.
- Guide vertical lines toward the third point.
- Adjust the form to create height and depth.
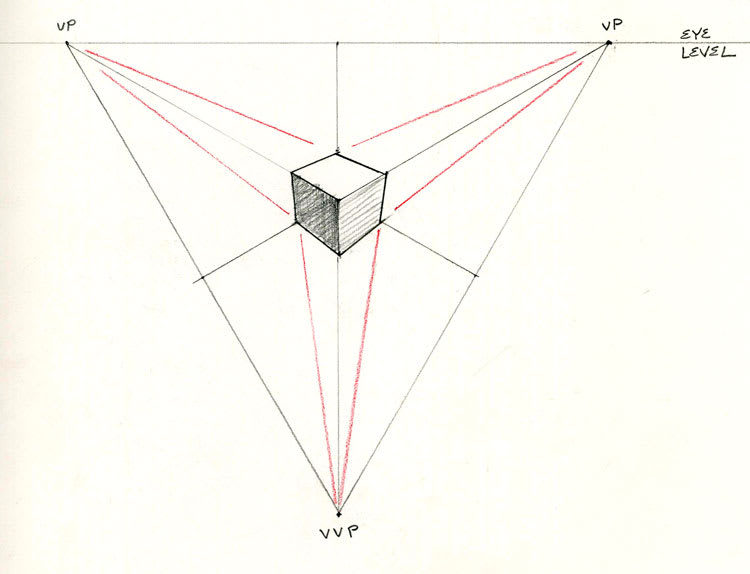
This adds strong depth and intensity to your piece.
Learn Perspective Drawing in Hanoi
For travellers, expats, and families looking for a creative and authentic experience, Hanoi has many places to learn how to draw. One of them is Art Tutor Hanoi.
Whether you are a solo traveller staying 2 to 4 weeks, a digital nomad exploring the city, or an expet family seeking a meaningful activity, joining a beginner friendly class makes learning how to draw perspective much easier and more enjoyable.

At Art Tutor Hanoi, we offer:
- From pencil drawing to watercolor, oil painting, and family friendly classes,…
- Flexible schedules.
- All materials included.
- English speaking teachers with friendly, step by step guidance.
- Spacious studio and garden with both indoor and outdoor creative space.
- Warm international community where travellers and expats can meet and connect.
- Convenient West Lake location, easy to access from central Hanoi
Conclusion
Mastering drawing perspective skill is one of the most important steps in learning how to draw. By practicing one point perspective, two point perspective, and three point perspective, you will build a strong foundation for all types of art. If you follow this drawing tutorial step by step and practice regularly, you will quickly see improvement in how you represent space and depth.
And once it clicks, drawing the world around you becomes much more natural.