
How to Create a Value Scale for Drawing
Drawing guide · Lesson 1.2
Creating a Value Scale
A value scale is a row of swatches from dark to light. This lesson shows how to build one in opaque media and in watercolor, how to check values on your palette, and how to avoid uneven jumps between adjacent steps.
Overview
This procedure shows you how to create a value scale using opaque media such as oil, acrylic, or gouache. You can create a three-, five-, or nine-value scale by stopping at the appropriate step. The same lesson also gives a separate workflow for transparent watercolor.

Lesson plate: creating a value scale.
| Scale | Use it for | Main advantage |
|---|---|---|
| Three values | Quick notan studies and simple block-ins. | Clarifies the biggest light/dark pattern fast. |
| Five values | Most beginner studies and everyday value practice. | Enough range to build form without overcomplicating the mix. |
| Nine values | Closer matching and smoother transitions. | Helps you judge subtle halftone changes. |
Checking values on your palette
When experimenting with values it is useful to paint a nine-value scale on your palette, or to paint the palette a middle gray (value 5 or 6). When you mix a color, paint a small spot on top of the gray scale on your palette and squint. Compare the spot with the surrounding gray: if it looks lighter, your color is a lighter value, and vice versa.

Paint a value strip on your palette, then compare test mixes against it.
Tip: If you use a transparent polycarbonate or acrylic palette, paint the underside middle gray so it stays clean and you can still see it while mixing.
Step-by-Step: Opaque Media
This part of the lesson covers oils, acrylics, gouache, graphite, and charcoal approaches where you are building clear steps from black to white.
| Materials | Use | Notes |
|---|---|---|
| Black paint White paint Small panel |
Use a small panel or sheet, about 6 x 8 in / 15 x 20 cm. | You need much more white than black when mixing middle steps. |
| Step one Middle gray |
Start with a pile of black and a pile of white paint, roughly five times as much white as black. Mix a pile of middle gray paint about halfway between them. | Caution: You need far less black than white to get a middle gray, not 50/50 as you might first think. |
| Step two Dark and light grays |
Mix some of the black and middle gray to get a pile of dark gray paint. Mix the middle gray and white to get a pile of light gray paint. | This gives you a five-value scale. |
| Step three Check spacing |
Check that there is an even jump in value between adjacent piles before painting. | If your midpoint in step one was inaccurate, the five piles will not be evenly spaced. |
| Step four Paint the five-value row |
Paint five squares using the values you have just mixed. | Keep the order from darkest to lightest. |
| Step five Extend to nine values |
Mix halfway between each adjacent pair until you have nine piles of paint, evenly spaced in value. | Mix black + dark gray, middle gray + dark gray, middle gray + light gray, and light gray + white. |
| Step six Paint the nine-value row |
Paint nine squares using the nine values you have mixed. | Make big piles before you start or it will be hard to match a value when you run out mid-row. |
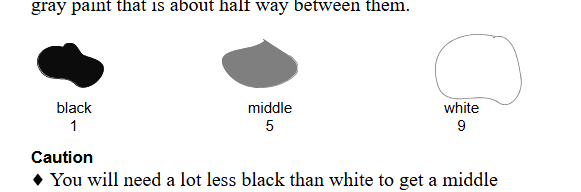
Step one: mix middle gray between black and white.

Step two: split the range into five evenly spaced piles.
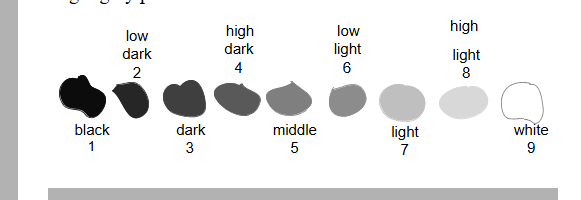
Steps five and six: fill the gaps until you have nine evenly spaced piles.

Five-value example.

Opaque media diagram: filling the gaps to reach nine values.

Nine-value example.
Step-by-Step: Watercolors
This procedure shows you how to create a value scale using transparent watercolor.
| Option | How to make gray | Important note |
|---|---|---|
| Option 1 | Use black watercolor paint and mix with water. | The easiest method. |
| Option 2 | Mix a pair of dark complementary colors, such as alizarin crimson and phthalo green. | Pre-mix plenty or your squares will drift too green or too red. |
| Option 3 | Use black and white gouache and follow the opaque-media procedure. | Best if you want to work the same way as oil or acrylic. |
Caution: You cannot just add white watercolor paint to regular transparent watercolors to lighten a mix. White watercolor paint is opaque while the other colors are transparent.
| Method | Process | Purpose |
|---|---|---|
| Method one | Try to get all 8 painted squares (the ninth is white paper) as close as possible to the correct values on the first attempt, let them dry, then modify with glazes. | Fastest route if you already control the wash well. |
| Method two | 1. Draw nine squares, one for each value. 2. Pre-mix a large quantity of wash so you do not need to remix halfway through. 3. Do a thin wash over the last 8 squares and let it dry. 4. Repeat, but cover one less square each time. 5. Continue until only one square is left for your black. 6. Check all values and adjust with more glazes if necessary. |
More systematic and usually easier for beginners. |
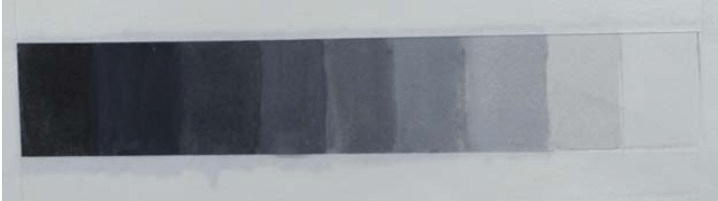
Watercolor value scale example.
Cautions: Creating an Even Scale
Make sure your values are evenly spaced. In other words, the rate of value change between each pair of adjacent spots should feel the same.
| Do this | Avoid this |
|---|---|
| Each step has a clear and even jump from one value to the next. | Some values sit too close together compared with the others on the scale. |


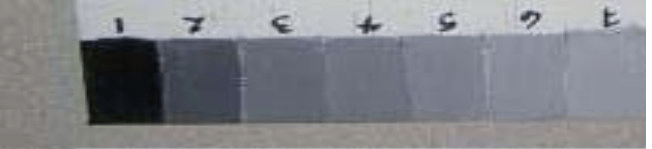
Compare even jumps with uneven jumps between adjacent values.
Common questions
- Pencil only? — Yes. The same principle applies if you build the scale with pencil pressure or a soft-pencil range.
- Do I need all nine values first? — No. You can stop at three or five values and expand later.
- What comes next? — In the next lesson you compare values in an actual subject using the scale you made here.
Free demo lesson
Want feedback on your value scale?
Submit your exercise for written feedback, explore courses, or continue the tutorial path.
Part of the Complete Drawing Guide. More chapters and lessons are listed on the main guide page.
YOUR HOMEWORK
Try it before your next class
Exercise 1 — Five-value scale
Time: about 1 hour · Materials: black paint, white paint, small panel or paper (about 15 × 20 cm).
Follow the five-value steps in this lesson (opaque media or pencil). Mix black, white, and three middle steps, then paint five squares from dark to light. Squint at the row: if one jump looks much larger or smaller than the others, remix that pair before you photograph the scale. Hold your phone in landscape when you take the photo.
Exercise 2 — Nine-value scale on your palette
Time: 2–4 hours · Materials: same as Exercise 1.
Extend your scale to nine even steps, then paint the full row. Keep a copy on the underside of your palette or taped to your board so you do not lose it between sessions. Before each drawing session, match one area of your subject to a swatch on the scale.
When you’re done: upload your photos below in Exercise submissions (log in if prompted).
Exercise submissions
Upload your exercise photos in a comment. Your tutor will reply on this thread.
Leave a Reply
Submit homework on this lesson — log in or create a free account.
Log in Create free account